Mapping technology has come a long way. We used to
mountaineer using a lensatic compass, a protractor, and at times with a
topographical map. Whether you hike, hunt, fish, or any activity were
navigating terrain is a possibility having mapping skills are a must.
I have used my dead-reckoning skills all over this globe in
both hemispheres. Technology has changed
so much since I picked up a lensatic compass.
In the early 1990’s I started to fly fish and I picked up a
watercraft a River Tamer II (man o man I miss that toon) from Water Skeeter.
When I purchased this watercraft, I quickly realized that I
would be floating creeks and river to fish. I then realized I had a huge issue
to figure out. The main concern was how many miles was any given section of
river or creek that I was going to float and fish?
I quickly realized that I needed reliable aerial mapping and
since this was early in aerial mapping industry it would be a struggle to get
those answers. I turned to several mapping websites and before Google Earth Pro
(GEP) GEP Download Link this is what it would take. Even using Geographical Information Systems
(GIS) back then was a struggle.
The reason for the struggle was GIS was back then in its
infancy stage. If you were good at using
a computer, you could download one of the GIS aerial maps and trace out a float
route or a hiking route. Then using latitudes and longitudes you could
calculate a set of coordinates. Then you could put them into your hand-held GPS
device.
This was a huge undertaking and normally would mean
countless hours of math and proving to oneself you are correct.
It was not until around the 2000’s that handheld GPS
technology caught up with the end user. I went through several models of
handheld Garmin GPS units. Well today I have a Garmin 64sx Garmin 64sx Link and it works like a
champ.
There have been and still are some great websites to help
one out using their hand-held GPS devices for instance.
The following website All Trails All Trails Webpage has a vast array of information. The
community has uploaded for your download pleasure trails that they have
navigated. This would cut down the learning curve substantially on anyone
planning a hike in each location.
Another program that has been to me one of the greatest
innovations in satellite imaging in decades if Google Earth Pro (GEP). This program has decent resolution, and you
can change the seasons of the map depending on the year you want to look at.
Why is this important well as you are most likely already know somethings are
easier to see from aerials in the winter vs the summer because of the leaf
cover. One of the greatest things about GEP is you can download if for free and
create a several data bases.
The other big bonus about GEP for example I can upload and
download from and to GEP to my hand-held Garmin. Now, I can’t do this directly,
but I can for an example download from GEP to my hard drive say for an example
a hiking route, float route, or just points of interest (POI).
Then I would open the program that Garmin uses call Base
Camp and upload the data. Here I can manipulate the data. I can add more POI’s
if I wish. I can find out what the elevations along the route will be like
potentially.
It’s also important to point out that it is easy to send
data to GEP and Base Camp. I have never had a data conversion issue ever with
my Garmin 64sx exporting and importing data sets from GEP or visa versa.
I am used to the tiny screen while hiking, floating and
while driving in my car.
Before I go into the next phase of this document, I need to
make the reader realize something. I have had 1000’s of hours in survival
training. My training comes from the Military and in the civilian sectors. I know for myself what is an acceptable risk.
I know my limitations of my abilities and I will make the best plan of
approaching any given situation with a lot of thought and research.
The owner will not be liable for any errors or omissions in
this information nor for the availability of this information. The owner will
not be liable for any losses, injuries, or damages from the display or use of
this information. (disclaimer author unknown)
I want to help further understand how different techniques
can be used to make a float trip plan.
I will use my vacation in Montana last year as an example.
After many months of conversations and trip preparations we decided to float
the Kootenai River in Libby, Montana.
I know this is not the best idea in the world to float that
river in a canoe, but we thought it was an acceptable risk. We would velcro all
the gear in the canoe and I would purchase a pair of out riggers from Spring
Creek. They can be found here Spring Creek
I will attach photos to show you how I rigged the canoe and
the other safety gear involved.


All gear was velcroed into the canoe amd their was a 22"x24"x14" dry box also velcroed into the middle of the canoe.
My first step was to choose a float route. I have been floating rivers and fishing them
most of my life. I have come to realize that an 8-mile float is a good stretch
of river to fish and float. This will give you plenty of time weather you’re
floating in a one-man pontoon boat or a canoe.
The steps I used are simple here they are “make sure your in
one file folder in GEP it will be easier to export data”:
1.
Choose route up to 8 miles
a.
Use local maps for example I used my search
engine for boat launches Kootenai River Libby, MT Here are my results.
1. Libby Montana Boat Launches
2. Libby, Montana Boat Launches
2.
Then when I have the geographical locations of
these boat ramps I put them into:
a.
a. Use GEP and use “add placemark”.

b. When this dialogue box pops up get the
coordinates from dropping a pin from Google Maps and after copying them from
Google Maps place them into GEP. “click ok to save Repeat this process for any
POI’s and then finally the takeout.

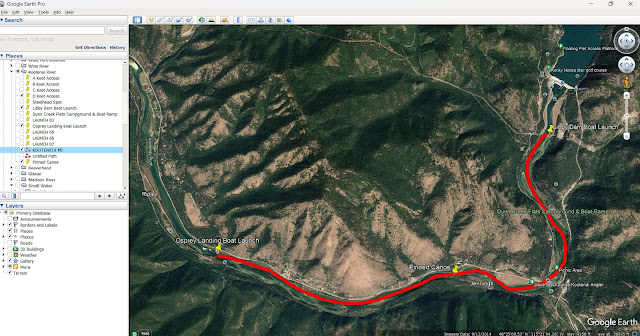
In Figure “A” you will see three Way Points:
a. Libby Dam Boat Launch (our put in)
b. Pinned Canoe (incident)
We pinned the canoe on a rock and subsequently swamped the canoe. When we got to shore, I knew looking at the handheld how much farther we had to go to the takeout. If I had to walk back to the truck, I knew how long it would take me to get there. I knew our exact position and if we had had a medical emergency and needed to use a satellite phone, I could give the coordinates to our exact location. Luck, skill, and training kept us alive that day. We should of never taken a canoe a white water raft would have been a better option, but for us it was an acceptable risk.
c. Take out
4. Then using GEP your going to create a new path
a. Select “New Path” and name it "See Red Arrow".
b. Assign a color and style.
c. Measurements can be in feet or meters
d. Trace out your path


5. 5 Having your file folder selected in GEP go to
File >>> Save >>> Save Place as “save it as a KMZ file” in
your designated file location”. For example mine is D:Documents/KMZ Files. At
this point all the work you have done to this point that’s inside of the file
folder you are working in GEP will be exported. As you grow your POI’s, Routes,
and other items in GEP you will have a folder for each project.
For now I will use my Garmin 64sx
along with Basecamp as my example to up-load to the handheld.
1.
Open Base Camp
Then go File/import into my collection/”locate file you exported from GEP”
You will now see those POI’s and the route you created.
This is a direct representation of the data we created with
GEP. From here you can see several pieces of data. You can see how the POI and
the route that was created. Here is a
breakdown of the data.

While you are on your float, hike, or other you will see your progress on your route. The handheld will tell your distance to your final destination. This case it was to our take out. It will also tell you based on your current speed how long it will take you to get to your take out.
No comments:
Post a Comment